 |
| My pen and diary :) |
I have an awesome quill ballpoint pen I completely forgot I had. It floated out underneath my desk the other night like it was destiny. I wondered how epic it would be to write my diary with a fancy pen and many thoughts of Hogwarts fluttered through my mind giving me inspiration, but unfortunately it was out of ink. I remembered when I purchased it one of the employees told me it was nonrefillable but I was determined to replace it nonetheless. I assumed the task would be simple but I was very very wrong.
The first thing I did was gently pull the pen part out of the feather. Right away I noticed was how small the ink cartridge was and what luck I would need to find another one like it. I made a huge mess going through countless pens until i found a couple that might work. I took apart the first one I found and just carelessly jammed the cartridge inside the pen tip. It didn't fit correctly and on top of that the ink exploded out all over my hands and the floor! I made a huge fuss about not making stains that I ended up kicking everything around and losing the pen tip for a moment.
I found it eventually and also some ink to refill my quill, but it still didn't work. I realized it was the actual pen tip. It was just scratching the paper and not gliding properly so I haphazardly cut the very point and replaced it with another one, trimmed the plastic part of the ink container, popped it back in the feather, and surprisingly, it wrote beautifully!
It took me a good ten minutes of scrubbing my hands using up half a bar of soap, another 20 minutes to tidy up room figuring out, and I probably have to chop off my nice long nails but it was definitely worth it!


 |
| My grubby little hands :( |


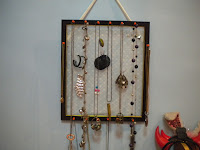
 So I decided to make a jewelry organizer! It was very simple and it took me less than an hour to construct it. I had all the materials around the house I just used a little innovation and creativity and I got this beautiful display!
 After you have your frame you should wipe it down. Especially if you want to paint over it. I left my frame the way it was and proceeded to adding the fabric. I used lace that I salvaged from a swimsuit cover up from last summer. I just used whatever I had in my closet but if you don't want to butcher your clothes feel free to buy some from a fabric store, craft store, etc.
 Anyways you want to adhere the lace to the frame. First I cut out roughly as much as I needed. I opted for staples because you need the fabric to be taut but not too tight that it stretches and rips or too loose that any accessories you add later on cause the material to sag. Trim any cloth as needed but don't worry if it's too neat, no one is going to look at the back of it!
 Next I just took some simple office tacks I stumbled upon (not literally!). If you're not as lazy as me you can go out and buy some real hooks but I personally think tacks look just as good. I added 14 tacks in all for necklace racks. You can use a hammer but I just did an open palmed strike like a kung fu master to push the tack into the frame. My hand was red and covered in circle indentations but it was so worth it. If your frame's wood is super sturdy please don't even try that.


